Monday, December 22, 2008
CABINETS!
This is the view out the back window (doesn't the island/table look great?).
The east wall -- I am so glad we did the little windows. The tin tiles will go behind the stove. Can't wait to see what they will look like.
The pantry -- Maurice and I worked out the shelving in the pantry, and I was worried because, really, what do I know about pantries and how they should be? But it looks great, perfect, in fact, and I am so happy about the design inside. Plus, it has a light that goes on when you open the door. How cool is that? You can see the bookshelf on the wall there on the left -- all of our cookbooks will fit (and more).
Next up, trim on the cabinets, paint on the walls (still have to pick a color everything looks very WHITE right now, and it will be so great to get some color in there), countertops (already picked out the slab -- they will be soapstone), recycled wood for the desktop, pulls for the cabinets (already picked them out at Restoration Hardware), tiles, putting up the lights, wood floors - still a lot, but every day it is so exciting to come home to see what the workers have done.
Monday, December 8, 2008
Walls, an Island and Tin Tiles
And wonder upon wonder, after living through the disappointment that the island I thought I had nailed down went missing, I found an island that I think I like even better. I was disconsolately trolling the Alameda Antiques Faire on Sunday, aisle upon aisle of stuff that almost worked, but would require so much modification, or a special top, or would have to be custom built, blah blah blah. I almost had given up (it was cold and I was sure I wasn't going to find anything) when I came upon this:
My initial reaction was, too simple, no drawers, etc. etc., but then I had a revelation which was -- this is it. I had the guy measure it and it was almost the perfect size. I called Maurice (on a Sunday, he was working, such luck) and he asked me to take a picture of it with my cell phone and send it to make sure if it didn't work they could modify it. I did, he agreed it could be modified, if necessary, and we could add wheels to make it the right height. I was sure it was meant to be, so I just made the decision that I was going to get it. I talked the guy down some on the price, but actually it cost us so much less than anything else we'd been considering. I was on cloud nine. Problem solved.
Then, I was so happy with my find that I thought that I would treat myself to some vintagey cool object that I would put in the kitchen and found these:
Aren't they awesome? I was going through them, laying them out in a design on the ground and all these people were passing by saying how cool it looked and how great they were, so that of course egged me on. A woman stopped to help me find ones that would go together and confirmed that I was indeed a genius. Here is the idea, although I am not sure it will be allowed, but I'd like to have these as the backsplash behind the stove. You can see the tile on the upper left of the picture -- the tiles could surround them -- we'd have to get some border type tile.
What do you think? The brownish one was a compromise, they didn't have any other white ones, but I thought I could probably come up with a white wash that I could do with paint that would appromixate the other ones.
Anyway, we are coming down to the fun stuff now -- the cabinets have come in and are ready to be installed, then we'll get the counters measured out -- in short, we can see the end of the tunnel!
Saturday, November 29, 2008
Insulation and More Windows
The big window over the sink was installed, however, and it looks great.
Also, we are working with Maurice on determining what the ledge outside on the deck should look like -- we are trying to make it more open so it doesn't feel as heavy. This looks so much better than it did originally, I think, and now we just need to figure out how to put up the right railing so no one falls through!
Speaking of railings, we've been trying to figure out what style of railing we should use. Maurice had an open house for two houses that he built in Berkeley and we went to see the railings on the decks there. I didn't take pictures, so I can't post them here, but here is the link that shows pictures of the houses and you can see the railings on the decks. http://www.openhomesphotography.com/1411_7th/
I like them a lot -- very simple -- but they might end up being too modern? What do you think?
Up next week -- stucco and dry wall. Pictures should be good!
Saturday, November 15, 2008
Windows and Doors
I think it will be fine though, once everything else is in place. The design of the deck had to accommodate our entrance to the basement, thus the ledge in front of the window - still trying to figure out exactly how that is going to look like.
Here are the doors from the inside -- again, a little hard to tell exactly what they are going to look like since the dining room is shut off:
Here are the windows that will be above the cabinets on the east side of the kitchen, and the window that looks west - Sage has already found where she will reside on Saturday mornings:
And finally, my favorite window to the south(which has not yet arrived) where we will have the sink:
The pantry has been framed out. The door will be at the angle, and on the left outside wall we will have a floor to ceiling bookshelf for our cookbooks.
While we have already made many choices, it does seem like they keep on coming. We have chosen the tile -- it was between the Heath tile (nice, but 2x the price) and the Italian tile (buttery color, not yellow, but a warm off white). We chose the Italian tile, mostly because of the price. It is lower price because it is factory made, rather than glazed by hand. I love the Heath stuff, and in fact our dishes are Heath now, but I liked the Italian stuff fine. Here it is -- its the big one on the bottom:
Up this week? More windows, I think. We'll see.
Wednesday, November 5, 2008
Island Choices
The idea with the second one is that we would put bun feet on the bottom and put a top (maybe zinc or distressed wood) on the top that would extend enough on one side to sit at. Like this one:
The first one would be a table, at island height (36"). No storage or shelves.
Post your comments below.
Sunday, November 2, 2008
More work and more rain
We saw Kendall, who seems to be having a great time in Seattle:
Had some great food and generally enjoyed ourselves at Pikes Market.
In the meantime, work was progressing on the house! The concrete for the foundation and decks was poured, and this week they put in the deck joists so you can see how big the decks will be:
Now we have to pick the deck material...it is spec'ed out for Evergrain -- which is a "green" material, a composite. Maurice dropped off the samples of Evergrain, Treks (Trex?) and Machete (an eco-friendly Brazilian hardwood). When you pick them up, your eye (of course) goes immediately to the wood. When we looked at the Evergrain and the Trex, we didn't really like them. One of the Trex samples, "Brasilia" actually looked ok, but when Maurice priced them out for us, the Trex material cost more than the Machete! Here are the samples (the Machete is the long one in the center):
While the Trex and Evergrain are "green" materials, I am not that certain what happens to them after someone tears out a deck -- do they decompose? Probably not. Anyway, because the decks are big, I am really worried about putting something in that I will eventually hate. Argh.
I am guessing we will go with the wood. I tried and tried to like the Evergrain, mostly because it is half the price, but I just can't see it. Oh well.
Monday, October 13, 2008
Our "Cozy" Kitchen
When we got the call that construction was going to start in a few days, we called Apple Appliances in Oakland (on a Sunday, after they had closed, yet they still answered the phone -- love that customer service) and bought, sight unseen, a 21" Wedgewood stove. She's a beauty, and for us, holds some sentimental value as it is the exact stove that we had in the first apartment we shared together(ok, really the second, but Concord doesn't count -- that was SUCH a horrible apartment -- like Communist Russia, a huge concrete block). It was installed the first day, out of one kitchen, into another, and works like a charm. She's on the right.
So, this last Sunday morning, I baked this tart in my tiny little Wedgewood just to prove that it is just as good as someone's fancy Viking. I found the recipe in a magazine ("Cottage Living") that I got at the airport this week (I liked the kitchen island on the cover, but the recipe was a bonus!) - wow, is it good. Here's the recipe:
Caramel Apple Upside Down Olive Oil Cake
1/2 cup unsalted butter
1 1/2 cups sugar, divided
3 Granny Smith Apples, peeled and quartered (depends on the size of the apples, if they are small, like mine were, you'll need more -- I used 8!)
5 large eggs, separated
3/4 cup extra-virgin olive oil
2 teaspoons vanilla extract
1 cup cake flour
1/2 teaspoon coarse sea salt
Garnishes - 1/4 teaspoon coarse sea salt; whipped cream or vanilla ice cream.
Place oven rack in middle of oven and preheat oven to 350. Melt butter over low heat in a 10 inch cast iron skillet. Stir in 3/4 cup sugar, combining well. Arrange apple quarters in a circular pattern around the outside of the skillet, and fill in the center with additional quarters. Increase heat to medium, and cook, without stirring, 15 to 20 minutes or until sugar turns golden brown. Looks like this:
Beat egg yolks and 1/2 cup sugar in a large bowl of an electric mixer at high speed about 3 minutes until thick and pale. Reduce speed to medium and slowly add olive oil and vanilla until well combined. Looks like this:
Remove from mixer and stir in flour until just combined.
Place egg whites and 1/2 teaspoon salt in a separate bowl of the electric mixer (or just transfer the egg yolk mix into a large bowl, wash out the mixer bowl VERY well to make sure there's no residual oil), and beat until the egg whites are frothy. Turn up the speed to high and beat until the egg whites form soft peaks.
Fold one third of the egg whites gently into the egg yolk mixture. Fold in the remaining whites, being careful not to overmix. Pour this batter into the skillet with the apples.
Bake at 350 for about 24 to 30 minutes or until golden and a toothpick inserted in cetner comes out clean.
Cool for 5 minutes (NO MORE, or the caramel will stick to the bottom of the skillet), run a knife around the edge and invert onto a large platter. If desired (and I did, it was good) sprinkle with 1/4 t of sea salt and serve with whipped cream or ice cream.
This is what it looked like:
Structure is costly
What comes down must eventually go back up -- and apparently, it is important to make it much much stronger than it was before. Our famous "Hardy Walls" arrived and were installed over the last two weeks. Here's what they look like:
Very strong. Strong as steel, because they are steel.
In addition to the Hardy Walls, it was discovered that our eastern foundation was below the dirt, and had to be raised 12 inches. Bummer. This will eliminate the eastern windows in the basement -- that is, we decided not to replace them -- I hate being in the basement anyway. Don't need the extra light. Again, this foundation will be better, stronger and will cook us dinner when we are hungry, so I suppose it is worth the extra cost.
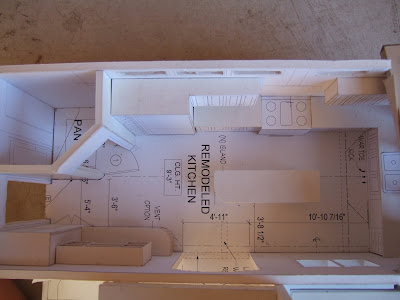
So as not to bore you too much with the foundational elements (except for you dad - this post is for you) here is a picture of our 3D model of what the kitchen is going to look like. Everytime I get worried, I look at my little doll house and get happy. Ahhh, now I feel better.
Here I am, looking out my back window into the yard...
And my favorite part of the kitchen, the walk in pantry -- look at it and weep...(its in the upper left hand corner)
Saturday, October 4, 2008
Rain, and More Decisions
They got a lot done this week, though -- finished taking down the fireplace and put up the roof over the addition. Here's what it looked like before and now. I thought that it would look totally different, but somehow it doesn't, does it?
We've got a lot of decisions made, but every time I turn around there seems to be yet another. Here is the sink we picked out:
And the fridge -- after a long discussion with a slimy appliance guy. Are they all like this? He kept trying to tell me I needed a "dual core" or something. And, maybe if I didn't care about quality, or keeping food fresh, I could forgo the dual core thing, but hey...I seem like a gal that was all about quality. So, I talked to Kevan, who is all about quality, and she got the Kitchenaid. Which is not dual core. And which is about half the price of dual core, although still pricey. Here it is:
Anyway, confirmed with Alan that he doesn't care about a water dispenser, and...decision made. Zach will be happy we got an automatic ice maker (which is standard, not extra). Now I have to decide if we want stainless or if we want it to have the panels that match the cabinetry. I don't know.
Saturday, September 27, 2008
Destruction
And the project begins....
So we started our kitchen project in a rush.
After 8 months of design, going back and forth, permitting, budgeting, rebudgeting, getting cold feet, recomitting, not really understanding that one day we’d have to begin to tear down walls….
We had a meeting with Maurice, our contractor, on Saturday, September 13, and he told us he wanted to start on Monday. We freaked out, needless to say, and had to spend the whole weekend cleaning out the basement to fit the stuff we moved out of the office to fit the stuff we had to move to the office to set up the kitchen which didn’t fit all of our kitchen stuff so we had to move more
stuff around in the basement to fit the kitchen stuff we couldn’t fit in the office. Whew. We were exhausted. In addition, Zach moved to Santa Cruz that weekend and we had to help him pack up his stuff. He was the lucky recipient of a bunch of kitchen extras that we simply could not face packing into more boxes.
Anyway, late Sunday night I realized I didn’t have any “before” pictures, so I rushed around taking them at night — bad lighting, so the kitchen looks even darker than it normally would look, making the “before” pictures even worse then the kitchen even is, or was, actually. The change will be even more dramatic once we put the “after” pictures next to these!